「Android Getting Started 4.0」修訂間的差異
跳至導覽
跳至搜尋
imported>Wikiuser |
imported>Wikiuser |
||
| (未顯示同一使用者於中間所作的 4 次修訂) | |||
| 行 8: | 行 8: | ||
請按照下列方式設置專案<br><br> | 請按照下列方式設置專案<br><br> | ||
<big><u>Step 1: 將SDK放入app專案的<b>libs</b>資料夾</u></big><br> | <big><u>Step 1: 將SDK放入app專案的<b>libs</b>資料夾</u></big><br> | ||
:請至[[Download Android SDK | :請至[[Download MADP Android SDK|下載 Download SDK]]下載SDK,並將壓縮檔內的AAR檔 (adpmobile-lib-rx.x.x.aar) 放至專案的libs資料夾, 若無libs資料夾請自行建立<br> | ||
[[檔案:Import_SDK7_Step1-1.PNG]] | [[檔案:Import_SDK7_Step1-1.PNG]] | ||
<big><u>Step 2-1: 在app的<b>build.gradle</b>的dependencies內加入下列程式 ( | <big><u>Step 2-1: 在app的<b>build.gradle</b>的dependencies內加入下列程式 (請根據aar檔名字自行調整)</u></big><br> | ||
[[檔案:Import SDK7 Step2-1.PNG]] | [[檔案:Import SDK7 Step2-1.PNG]] | ||
:請加入TAMedia的SDK和Google Play | :請加入TAMedia的SDK和Google Play Service的廣告模組,Retrofit函式庫, 如需支援Android 4.0作業系統, 請將okhttp版本鎖定在舊版3.12.8解決TLS閃退 | ||
dependencies { | dependencies { | ||
/* Other dependencies... */ | /* Other dependencies... */ | ||
implementation 'com.google.android.gms:play-services-ads-identifier:16.0.0' | <b>implementation 'com.google.android.gms:play-services-ads-identifier:16.0.0'</b> | ||
implementation 'com.squareup.retrofit2:retrofit:2. | <b>implementation ('com.squareup.retrofit2:retrofit:2.9.0')</b> | ||
implementation files('libs/adpmobile-lib-rx.x.x.aar') | <b>implementation("com.squareup.okhttp3:okhttp:3.12.8") { /* Use old version okhttp to fix TLS crash issue */</b> | ||
<b> force = true</b> | |||
<b>}</b> | |||
<b>implementation files('libs/adpmobile-lib-rx.x.x.aar')</b> | |||
} | } | ||
<br><br> | <br> | ||
:compileOptions請加入JAVA 8 | |||
android { | |||
compileOptions { | |||
sourceCompatibility JavaVersion.VERSION_1_8 | |||
targetCompatibility JavaVersion.VERSION_1_8 | |||
} | |||
} | |||
<br> | |||
<big><u>Step 2-2: 在Project的<b>build.gradle</b>的repositories內加入google()</u></big><br> | <big><u>Step 2-2: 在Project的<b>build.gradle</b>的repositories內加入google()</u></big><br> | ||
[[檔案:Import SDK7 Step2-2.PNG]] | |||
:Google Play Service版本若為11.2+, 必須在repositories新增<b>google()</b>, 這是因為Google Play Service自11.2版本後, 改透過maven.google.com取得 | :Google Play Service版本若為11.2+, 必須在repositories新增<b>google()</b>, 這是因為Google Play Service自11.2版本後, 改透過maven.google.com取得 | ||
| 行 55: | 行 67: | ||
<big><u>Step 3: 在<b>AndroidManifest.xml</b>的manifest tag宣告權限</u></big><br> | <big><u>Step 3: 在<b>AndroidManifest.xml</b>的manifest tag宣告權限</u></big><br> | ||
[[檔案:Import SDK7 Step3-1.PNG]] | |||
:<ul><li>Required Permission</li></ul> | :<ul><li>Required Permission</li></ul> | ||
於 2020年8月25日 (二) 09:09 的最新修訂
簡介
- TAMedia SDK提供Android Mobile App開發者簡易迅速的方式整合行動App廣告, 廣告的種類包含橫幅Banner, 全版Interstitial, Rich Media, 原生性廣告以及InRead廣告, 使用上跟Google Mobile Ads (Admob)類似, 能大量節省開發者學習時間
系統需求
- Android 4.0.3以上 (API Level 15+), InRead廣告則需Android 5.0以上才能取得廣告 (API Level 21+)
Android Studio專案整合SDK
請按照下列方式設置專案
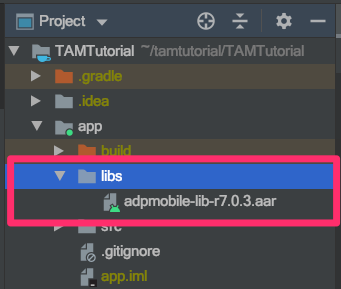
Step 1: 將SDK放入app專案的libs資料夾
- 請至下載 Download SDK下載SDK,並將壓縮檔內的AAR檔 (adpmobile-lib-rx.x.x.aar) 放至專案的libs資料夾, 若無libs資料夾請自行建立
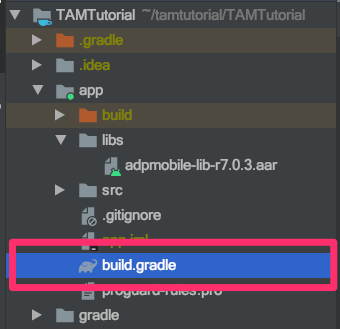
Step 2-1: 在app的build.gradle的dependencies內加入下列程式 (請根據aar檔名字自行調整)
- 請加入TAMedia的SDK和Google Play Service的廣告模組,Retrofit函式庫, 如需支援Android 4.0作業系統, 請將okhttp版本鎖定在舊版3.12.8解決TLS閃退
 dependencies {
      /* Other dependencies... */

    implementation 'com.google.android.gms:play-services-ads-identifier:16.0.0'
    implementation ('com.squareup.retrofit2:retrofit:2.9.0')
    implementation("com.squareup.okhttp3:okhttp:3.12.8") { /* Use old version okhttp to fix TLS crash issue */
        force = true
    }
    implementation files('libs/adpmobile-lib-rx.x.x.aar')
 }
- compileOptions請加入JAVA 8
 android {
   compileOptions {
       sourceCompatibility JavaVersion.VERSION_1_8
       targetCompatibility JavaVersion.VERSION_1_8
   }
 }
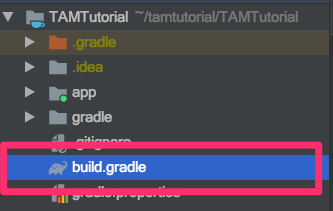
Step 2-2: 在Project的build.gradle的repositories內加入google()
- Google Play Service版本若為11.2+, 必須在repositories新增google(), 這是因為Google Play Service自11.2版本後, 改透過maven.google.com取得
 buildscript {
     repositories {
         google()
         jcenter()
     }
     dependencies {
         classpath 'com.android.tools.build:gradle:3.0.1'

         // NOTE: Do not place your application dependencies here; they belong
         // in the individual module build.gradle files
     }
 }

 allprojects {
     repositories {
         google()
         jcenter()
     }
 }
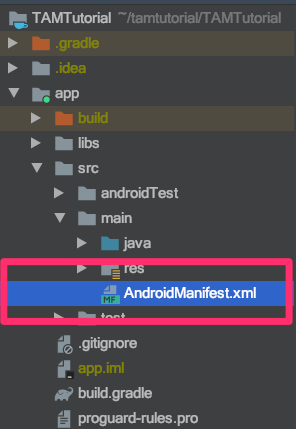
Step 3: 在AndroidManifest.xml的manifest tag宣告權限
- Required Permission
 <!-- TAMedia Required Permission -->
 <uses-permission android:name="android.permission.INTERNET" />
 <uses-permission android:name="android.permission.ACCESS_WIFI_STATE" />
 <uses-permission android:name="android.permission.ACCESS_NETWORK_STATE" />
 <uses-permission android:name="android.permission.READ_PHONE_STATE" /> <!-- SDK4.0以上版本請移除 -->
- Optional Permission
 <!-- TAMedia Optional Permission -->
 <uses-permission android:name="android.permission.VIBRATE" />
 <uses-permission android:name="android.permission.CAMERA" />
 <uses-permission android:name="android.permission.RECORD_AUDIO" />
 <uses-permission android:name="android.permission.ACCESS_COARSE_LOCATION" />
 <uses-permission android:name="android.permission.ACCESS_FINE_LOCATION" />
 <uses-permission android:name="android.permission.WRITE_EXTERNAL_STORAGE" />
Step 4: 在AndroidManifest.xml的manifest tag宣告Activity
 <activity
    android:name="com.taiwanmobile.pt.adp.view.TWMAdActivity"
    android:configChanges="orientation|keyboardHidden|navigation|keyboard|screenLayout|uiMode|screenSize|smallestScreenSize"
    android:hardwareAccelerated="true"
    android:theme="@android:style/Theme.Translucent" >
 </activity>


